


 out of the hole with a pair of pliers.")


How to use a tyre-puncture repair kit

Be prepared with a good tyre-puncture repair kit, know how to use it and then you'll be ready for action when the time comes.
Prevention is better than a cure, everyone knows that, but sometimes things simply happen. In the world of off-roading, tyre punctures are a definite possibility. You might be the most vigilant driver around – checking your tyres' condition, inspecting them for wear and tear, cracks, splits, cuts but your tyres may still cop an errant nail, screw or stick in the tread or sidewall; and that's puncture time.
Your tyres are your points of contact with the ground, so never drive for any great distance when you know one or more of your vehicle's tyres are punctured. The simple solution is to fix the puncture, so you can drive the, hopefully, short distance to reach a tyre professional who will then properly fix the tyre or replace it.
Be prepared with a good tyre-puncture repair kit, know how to use it and then you'll be ready for action when the time comes.
Note: Only use a tyre-puncture repair kit on tubeless-type tyres. Also, and this is a great tip from aftermarket supplier ARB: "Never attempt a repair on a tyre that shows signs of internal or external structural damage such as exposed belts, sidewall bulging, ply separation, cracks etc."
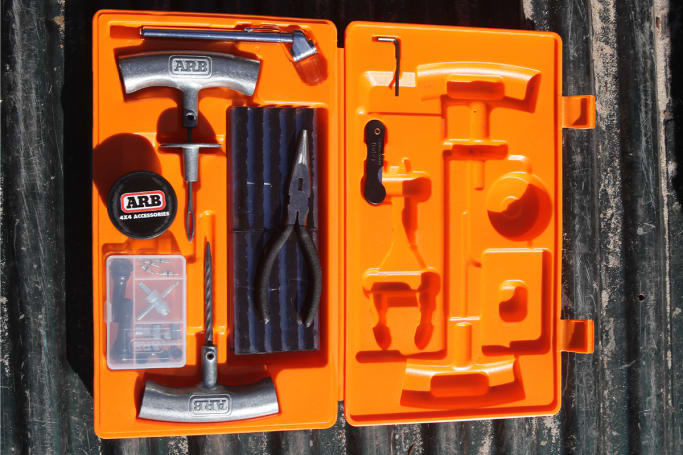
What is in a tyre-puncture repair kit?
A tyre-puncture repair kit should include a carry case and all of the gear you need to achieve a temporary fix of a puncture, which will give you enough leeway on that repaired tyre to safely reach a tyre-repair professional in order to have it properly fixed.
As with any gear, you get what you pay for so when it comes time to buy a tyre-puncture repair kit, spend as much as you can afford because that way you'll ensure you have the best quality equipment onboard. In this yarn, we're using an ARB Speedy Seal Mk2 kit ($49).
The tools and materials in a tyre-puncture repair kit include:
A pair of pliers: Use these to remove the cause of the puncture (i.e. the nail, stick etc).
Lubricant: Use this on the reamer to ease its way into the hole.
The reamer: It looks like a cross between a short ice pick and a drill bit with a handle. The reamer is used to probe the puncture, clear away any remaining debris and temporarily separate the tyre's steel belts without damage, helping to smooth the way for the repair cords/plugs.
The cord-insertion tool: Looks like a cross between a sewing needle and an ice pick. You use this to, you guessed it, insert the repair cord into the puncture.
Repair cords: Thick strings of spongy cord that you insert into the puncture to fill the hole and make the tyre temporarily safe to drive on.
Some kits, like this one, include valve accessories, a blade (to trim the repair cords) and more.
How to use a tyre-puncture repair kit – step by step:
Pull out the object that caused the puncture
Make sure your vehicle is on as flat ground as possible, is switched off, in gear and the handbrake is engaged. If possible, do all of your repair work while the tyre is still on the vehicle, that way its weight will help you maintain a stable working area while you fix the puncture.
Find the punctured spot, and pull the offending object (stick, nail etc) out of the hole with a pair of pliers, as provided in the ARB Speedy Seal Mk2 kit.

Clear the puncture hole
Then you need to clean the hole as best you can so no left-over material can cause any further problems and your repair cord has a clear hole in which to adhere.
Smear the kit's lubricant on the reamer – this is the tool with the spiral, drill-bit-like shaft – then insert the reamer into the puncture to clear the hole. Move the reamer around in the hole, in circles, in order to make the hole a bit bigger, separate the steel belts, then pull the reamer out. Now's the time to reinflate the damaged tyre to help wth insertion of the cord.

Thread repair cord into your insertion tool
Next, thread a length of repair cord through the eye of the insertion tool so there are equal lengths of cord protruding from either side of the tool. Then smear a bit of lubricant on the insertion tool if necessary and push it into the hole until only a little bit of the repair cord is visible.
Extract the insertion tool and trim the repair cord
Hold the tool's metal hilt against the tyre, and pull the insertion tool out. Do not twist the insertion tool's handle. Trim the ends of the repair cord so they aren't protruding too much, inflate your tyre back to the suitable pressure and away you go.

Get to a tyre-repair professional as soon as possible
I've been on desert trips where some fellow travellers have been forced to drive for hundreds of kilometres over sand dunes and corrugated dirt tracks on tyres repaired with a kit such as this, but it's better if you avoid doing that if you can.
Our recommendation is to have the fixed tyre repaired by a professional as soon as you possibly can.


Comments